Tuesday, April 29, 2014

Google Tasks - no more Post-it notes!


I'm a big sticky note person.
I have little yellow Post-it notes that remind me to read my other Post-it notes, if you know what I mean!
There is a great little app that's very easy to find and use that can help you get rid of your sticky note....I'm on my way!

GOOGLE TASKS

To access your TASKS, while in Gmail, click "Mail" in the top left hand corner and tasks will be one of the drop down options.

* Start by clicking on your "Mail" button in your Google Drive. You'll see the word "Tasks"  
in the drop down.


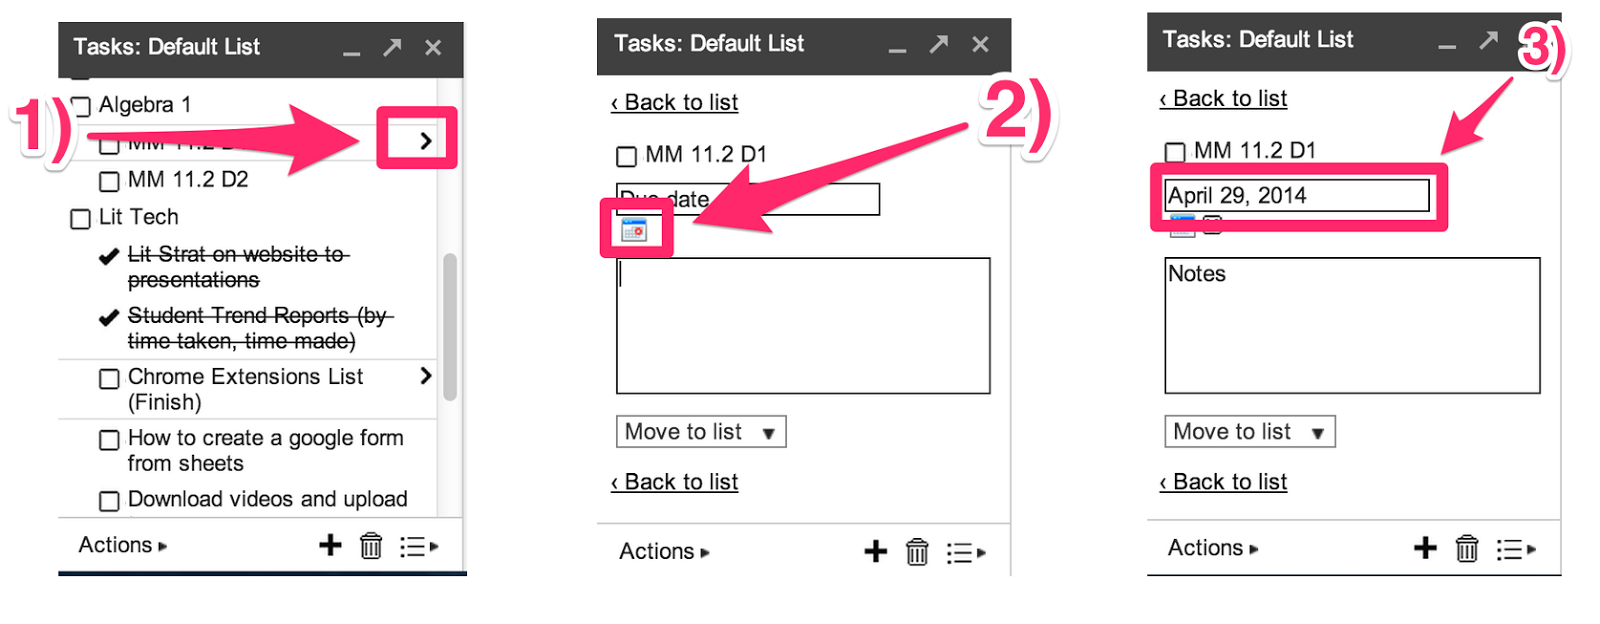
* Click on the plus sign and a box opens up for you to enter a short description of whatever topic/meeting that you'd like to remind yourself of; the calendar opens up and you can choose when this event needs taken care of; you then are directed to move it to whatever list category you'd like. 


* If you'd like....synch with your Google calendar - 


Add tasks on the go with an app.  
You can use the free app GoTasks on your iPhone and 
any task will automatically added to your Google Tasks list.  Including dates.

No more lists and Post-its to work off of!!


Snipping Tool


SNIPPING TOOL

You find a great image and would like to add it to some work that you are doing. Or, you find an image that you want only part of and would like to cut out the part that you'd like to add to a document, a Power Point or Google Presentation.

Some may be familiar with using the "Print/Screen" option, but when using Google Docs I think you'll find that the Snipping Tool is a bit quicker and easier for you and your students.


Open the image that you'd like to cut. Click on your Start Button
and you'll find the Snipping Tool on your Start column. Click on it.
Go to your image and click on it once. Then click on the word in the box -
"New." You'll see that the image gets faint, that's okay. Take your cursor and start dragging over
the part of the image that you would like to use, it will then get brighter. When you're done, go to the top of the page and click on "Edit" then "Copy". Then you can proceed to where you'd like to place it and paste it there.

BEFORE -


AFTER - 


There are a couple of other features to the Snipping Tool option -

- With a little "highlighter" you can highlight something on an image before you snip it - highlighter yellow, though they have other color options
- There is a "Pen" feature - about 5 different colors that you can use to write some additional information on an image
- As well as selecting your image in a rectangular shape, they offer a "Freeform" pen where you can draw whatever shape around whatever part of an image that you'd like

Voila!
That really is all there is to it and it's SO helpful!
Let me know if you try it out!


Monday, April 28, 2014

Editing YouTube Videos for Your Classes

YouTube Video Editing Sites

We all like to find good videos that help with introducing a lesson, expanding on a concept, or just to share with our classes a whole-length video. However, if you're like me you have probably run into the frustration of added advertising, or sometimes even inappropriate movie promotion advertising, or comments that you'd prefer your students not see.

Here's a fellow teacher's blog site, "Teaching Forward," that includes information on a couple of helpful sites that we can use to convert the videos into a safe-for-classroom-viewing format.
Let me know if  you check them out!

View Pure - "Videos Without Clutter"
1. Copy the share link for the YouTube video that you want to use
2. Go to View Pure and paste the link into the share link
3. Click "Create" to see you video free of any distractions!
4. Copy and share the unique URL to direct students to the View Pure version of the video clip.

********************

Tube Chop - Trim video to desired length and get unique URL with desired start and end points, free of distractions. 
LOVING THIS ONE!!

  1. Copy the share link for the YouTube video you want to use.
  2. Go to tubechop.com and paste the link into the share link.
  3. Click “Search” to locate the video as it exists on YouTube & click “Chop It” to edit the video start and end time.
  4. Adjust the start and end time to the desired length using by sliding the grey bars that appear below the video
  5. Copy and share the unique URL to direct students to the “purified” version of the video clip.


HammerTime - Tube Chop   (because sometimes you just need to shorten the message!)

: )
********************

Here's a couple of other options that can help you with customizing, hiding, extra side-videos, etc. 

3. SPOI Options (formally YouTube Options)
This extension is marvellous! It breaks down so much for the user and allows you to customize a great deal. With SPOI you can, hide YouTube video ads, annotations and mentioned videos on the side. All of which are major distractions


*******************


4. Hide YouTube Comments
The title says it best. What more could you ask for? When you add SPOI in combination with Hide YouTube comments (both available in the Chrome Web Store) you get this

Wednesday, April 9, 2014

Converting a WORD Doc to a Google Doc

Converting a WORD Doc to a Google Doc -

Many of us have WORD documents that we have been using in our classes. Since the move to Google Drive, the question has come up - "How do I convert my WORD Docs into a Google Doc?"
This may be because now you'd like to share it or collaborate on it with others, or perhaps you'd like to share the document contents with your class via Doctopus.

The process is relatively simple. Once you start doing it regularly, it will become clear to you.

In your Google Drive - next to the red CREATE button you'll see an UPLOAD ARROW. Click on it and it will direct you to your "Files" or "Folders." If this is your first time, I suggest choosing one file (although it's just as easy to upload folder). Click on the file that you'd like and it will end up in your Google Drive with a "W" - although, it's kind of a little wavy and not quite like a regular Microsoft Word "W." You'll then want to open it up and will be asked what you want to open it up with - choose "Google Docs." You are then good to go!

And, by the way, you haven't lost your WORD document. You can still access it in WORD, or in Google using that "Open With" option.

Here's a good little video by Richard Byrne from Free Technology for Teachers that will show you how simple it is.


Free Rice

FREE RICE.COM

Click on the link above to get to the site Free Rice.com.

This site is set up through the United Nations so that every correct answer from visitors to the site, contributes 10 free grains of rice to the United Nations World Food Programme. The "quizzes" (aren't really quizzes) but a great review for learning vocabulary, math, geography, even foreign languages!

Students love to see how many grains of rice they earn in a time period, and on a rainy weekend, some students keep going...without actually realizing that they not only are doing something good for the world, but maybe even learning some things!

Players can choose subjects and subject levels at the site.
It's a great "free time" activity at the computer for students and adults alike!

TIMELINE App

We've come across a wonderful app for teachers and students to create their own timelines. It's located on the Read Write Think .org site which has several other interesting apps to check into as well.
click here for the  - TIMELINE app

It's quite simple for students to use. They sign in, choose a start date and event, and can even add various pictures into their timeline.
Ideas for using a timeline could include as a book report - following a story character from start to finish.

In a history lesson, what events occured and in what order - for example in a study of the Revolutionary War, what happened that led up to the British sending troops to the Colonies; what happened in the Boston area pre-war time; and follow along from either a Minuteman or Redcoat point of view...or, just use it to mark certain events throughout the entire war.

In Tech Ed classes students could put together a timeline showing the changes in the invention of the bicycle over time, for example.

The addition of pictures either from an Internet search or drawings that students create themselves and then import into the program, definitely helps add some interest to the timeline itself.

Students can save and send their Timeline file to a teacher or themselves, as well as add it to a document - though here's an example of where use of the Snipping Tool feature is quite helpful for your students to transfer their finalized timeline onto their document.

Try it out and let me know what you think!


Thursday, April 3, 2014

Live Binders

Live Binders is a great organizing tool for teachers. All of your lessons, videos, documents, files can be up-loaded to this easy to use program. It is a wonderful way for teachers to gather and keep their collections of resources and lesson plans.

Picture a 3-ring binder with tabs in it to divide up different worksheets, lessons, even video links that you might be storing for lessons....but, picture this binder on-line and you can pull up any and all of your tabs as you need them for a class, or assorted classes in a school day.

Some teachers post  a link to their class Live Binder tab to their individual or school website so students can easily and readily access this work from home. For those interested in setting up a "flipped classroom" this is a good place to have as your "Command Central" for your students to do their work  and research at home.

Teachers are also able to access other teachers' "Live Binders" in an assortment of grade levels and curriculum areas. Check out this link for those resources.
Some people, students and teachers, are setting up their own personal ePortfolios using Live Binders. Check into that here.

Take a look at this intro video and you'll see how easy and convenient Live Binder is to use for so many classroom teachers at all grade levels.


HERE'S an excellent example of a very thorough Live Binder for multiple grade levels that includes a variety of curriculum area topics. In time, your Live Binder efforts can build up to this level and become a tremendous resource for you and your teaching peers!!

Let me know if you try Live Binders and how you are using it!